
The Intent Engine turns a simple source into one or more controller actions. It also decides how timing, requirements, and conflicts work.
This section covers the features available in the current app editor. You do not need to edit configuration files or know how the software is written.
Open and save an Intent
- Open the input's mapping editor.
- Expand the mapping card.
- Tap Edit Intent.
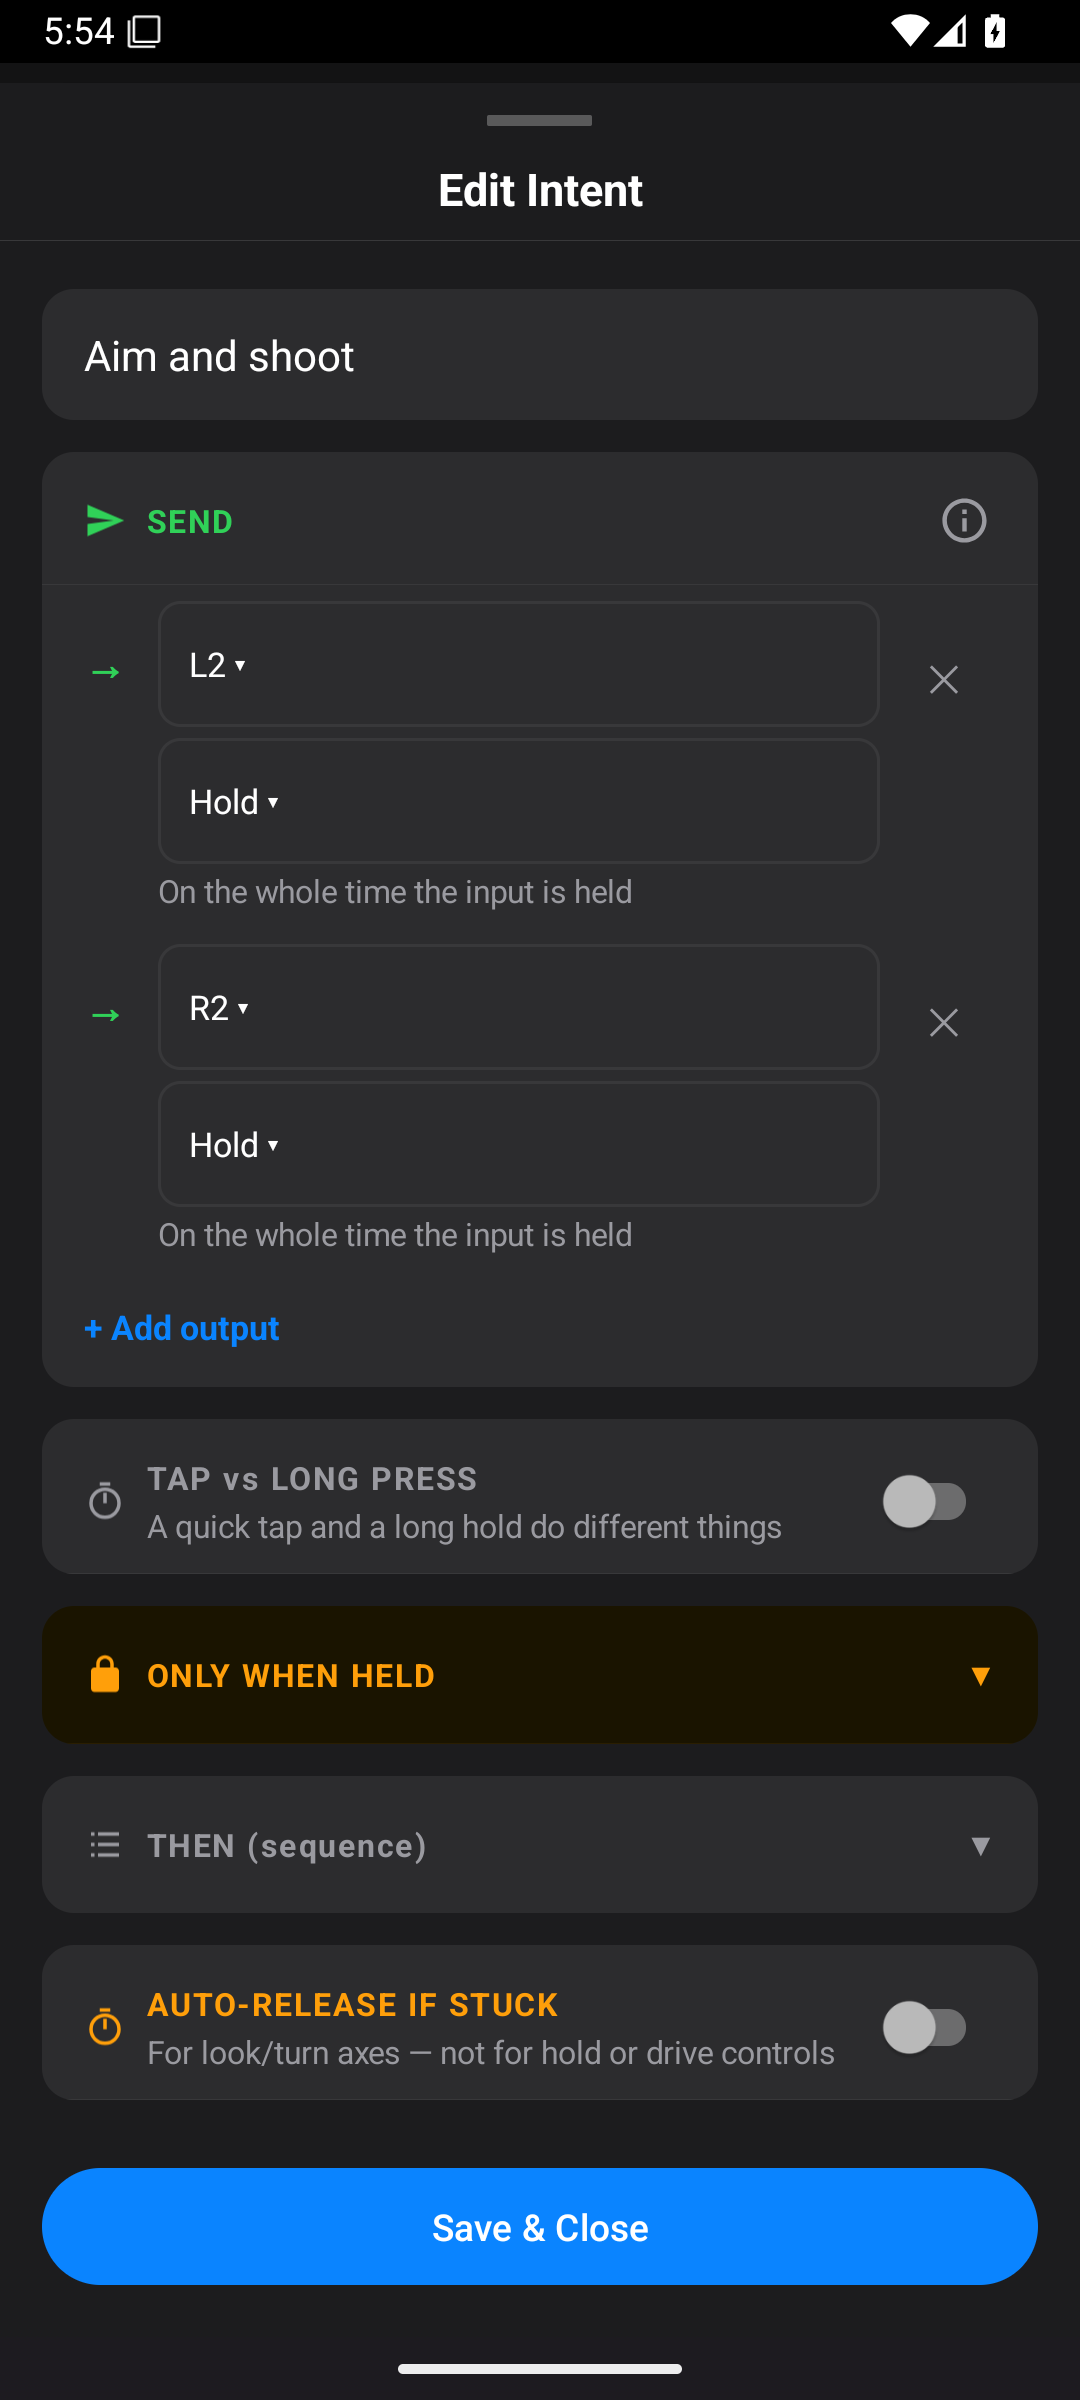
- Give it a useful name, such as Aim and shoot.
- Make your changes.
- Tap Save & Close.
- Finish the input editor with Done.
For Virtual Input, select a button in the layout editor and use Edit tools → Intent.
The name
The name is a label for you. It helps you recognise the mapping in cards and the Control Map. A name such as Aim and shoot does not set up those actions by itself. You still need to add the right outputs.
SEND: choose the actions
Each row under SEND has a target and a behaviour.
- Tap the target drop-down to choose the controller control.
- Tap the behaviour drop-down to choose what it should do.
- Tap + Add output to add another row.
- Remove an unwanted row with its × control.
- Use the row's timing controls when shown. The clock icon opens timing fields where available.
- Tap the ⓘ icon to read the section help.
Typical targets include the four face buttons, D-pad directions, shoulder buttons, triggers, stick clicks, menu buttons, and sticks. The button-name table translates the neutral names into familiar controller labels.
For Left Stick or Right Stick, choose the direction chips shown by the editor. These represent stick movement, which is different from a D-pad direction.
Multiple outputs are handled separately. They can start together, but each one still goes through the app's priority rules. Adding two rows does not give them special priority over other inputs.
All six SEND behaviours
ms means milliseconds. There are 1,000 ms in one second. 500 ms is half a second.
| Behaviour | What happens | When it is useful |
|---|---|---|
| Hold | The output stays active while the input is active, then releases | Aim, accelerate, block, or hold-to-sprint |
| Tap | A press starts one short output pulse | Jump, confirm, reload, or a single menu press |
| Rapid tap | A press starts repeated taps for a set time | A short burst of repeated game-button presses |
| Tap while held | Taps repeat while you keep the input active | Repeated fire or repeated menu movement that stops when you let go |
| On release | A short output pulse starts when the active input is released | Confirming a choice when you let go of a switch |
| Long press | Nothing happens on a short press; after the hold threshold, the output becomes active until release | Avoiding accidental activation of a secondary action |
Hold
Set the target and choose Hold. Press or activate the source to hold the output. Let go to release it.
For example, L2 + Hold is useful when the game uses L2 for aiming. If you use an analog source, its value may also affect an analog target. A simple switch gives an off/on action.
Tap
Set the target and choose Tap. The normal short pulse is 80 ms. Change its timing where the row offers it.
The tap starts on the press. It does not wait for you to let go. It can finish its short pulse even if you release the physical input sooner.
Choose this for a single press. Holding the source does not automatically turn it into repeated taps.
Rapid tap
Choose Rapid tap, set the For duration, and set at taps per second. For example, 1,000 ms at 5 taps/sec creates a short repeated-tap burst.
This burst can continue for its configured duration after you release the source. Use Tap while held if you need repetition to stop as soon as you let go.
The rate is limited to 1–20 taps per second. A game may ignore taps that arrive too quickly. Test a slower rate first.
Tap while held
Choose Tap while held and set its taps-per-second rate. It repeats only while the source remains active.
This can help when repeatedly pressing a button is tiring. It cannot make a game accept a faster fire rate than the game supports.
On release
Choose On release. First activate the source, then let go. The output sends a short pulse when the source becomes inactive.
This is useful when release is easier to control than the first press. It also means there is no action until you release. Do not use it for a stop control that you need to work immediately on pressing.
Long press
Choose Long press and set the hold threshold, normally 500 ms to start with.
A short press does nothing. Once the source has stayed active long enough, the output stays active until you release it.
Use this when an action should need a deliberate hold. It differs from the two-function TAP vs LONG PRESS mode below.
TAP vs LONG PRESS: two jobs on one input
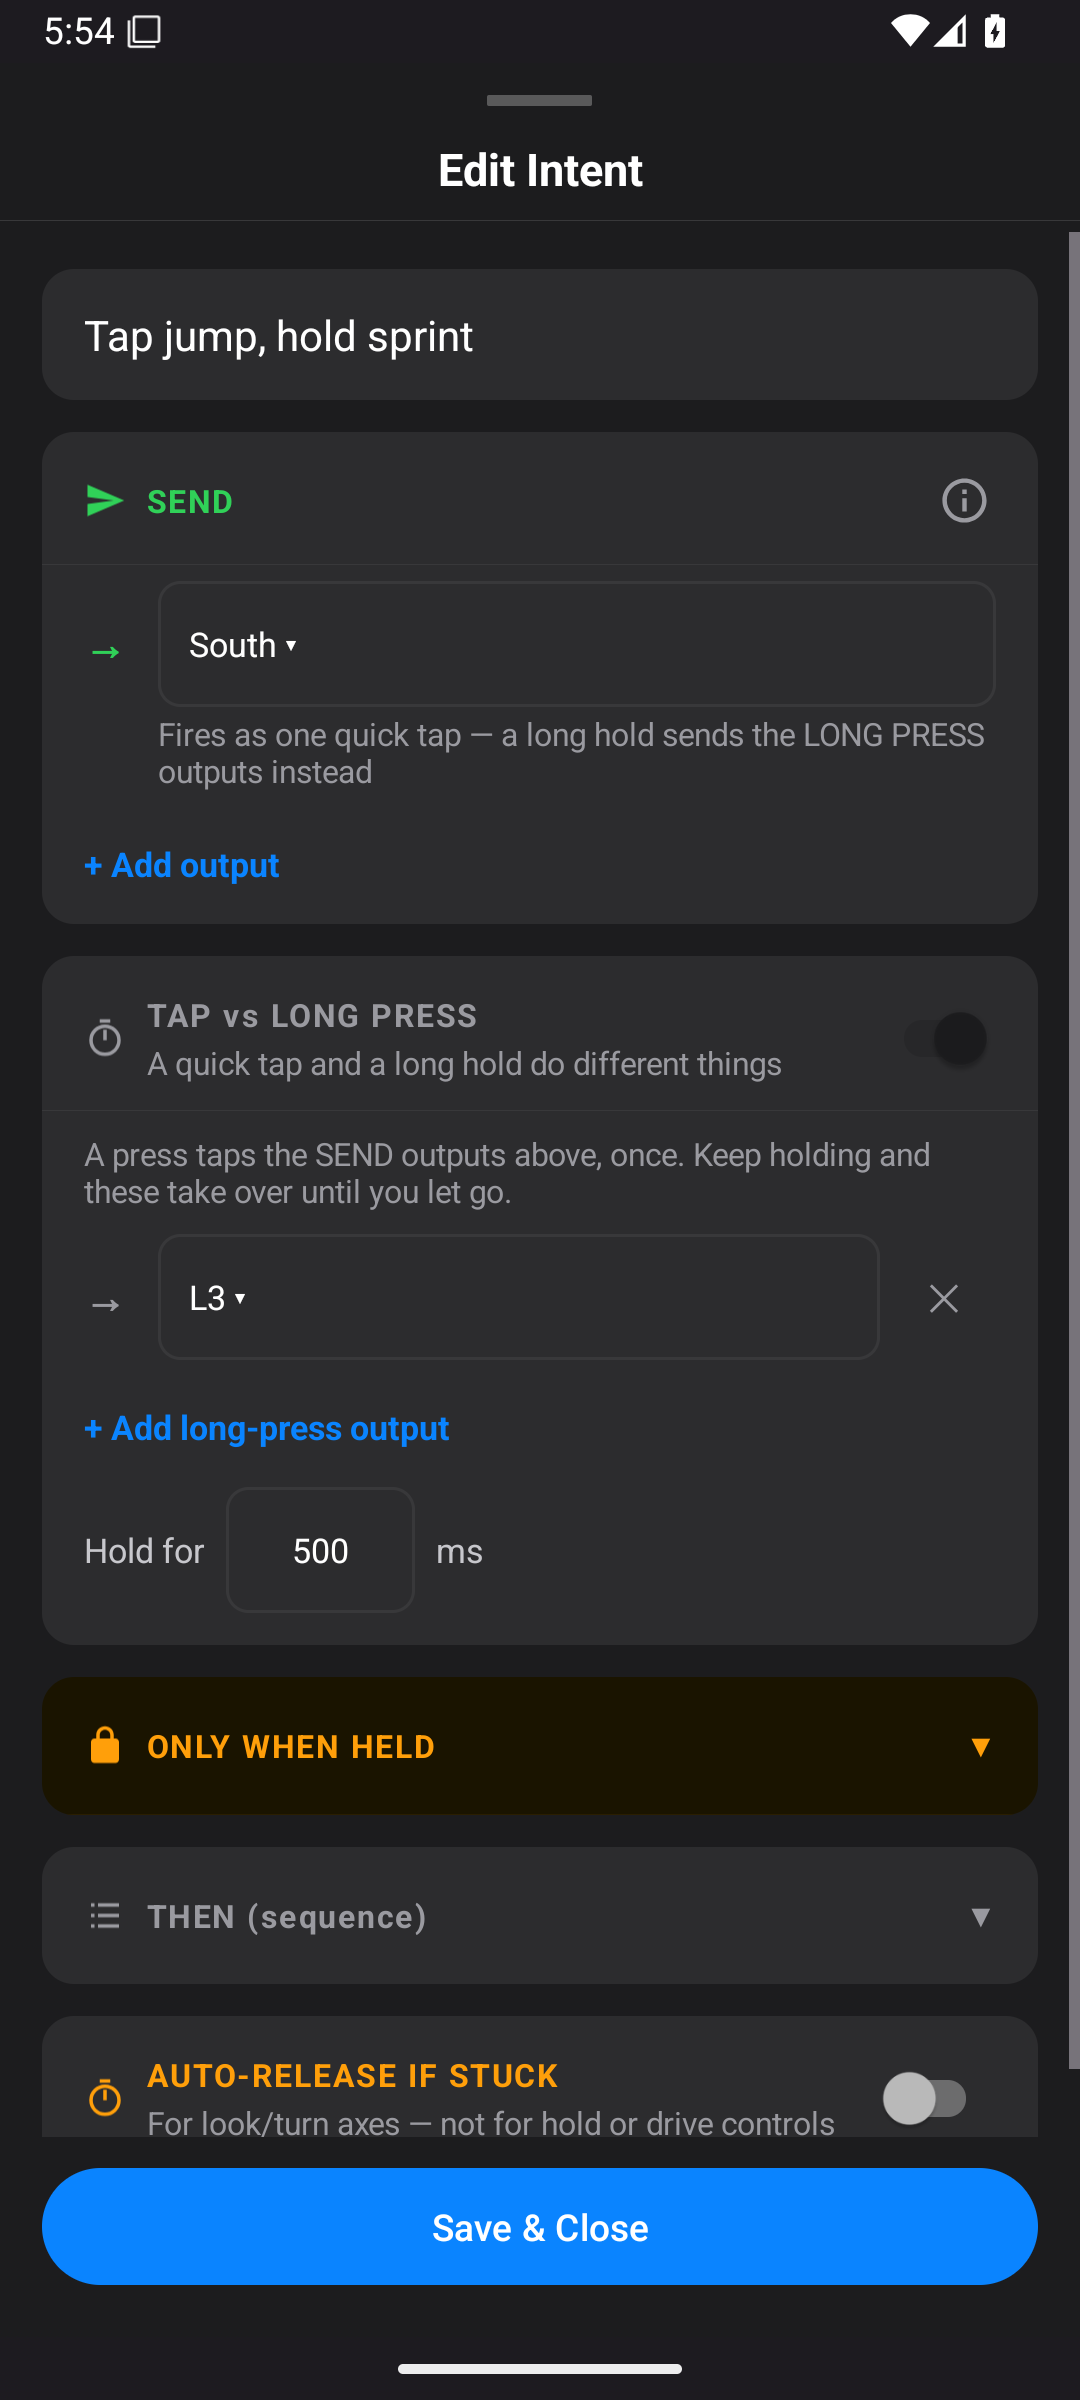
Turn on TAP vs LONG PRESS to give one input a quick action and a held action.
- Put the quick action in SEND.
- Turn on TAP vs LONG PRESS.
- Choose a long-press target.
- Use + Add long-press output if you need more than one held output.
- Set Hold for in ms.
- Tap Save & Close.
The quick action happens when you first press, even if you keep holding. After the threshold, the long-press outputs take over until you let go. The app does not wait to discover whether you meant a tap or a hold before sending the first tap.
For example, the screenshot sends a jump tap, then adds sprint if you keep holding. This is useful only if that first jump is also acceptable when you want to sprint.
If you want a held action with no initial tap, leave this mode off and use the normal Long press behaviour in SEND.
When this mode is on, SEND acts as the quick-tap set. It is not the normal set of independent Hold/Rapid tap rows.
ONLY WHEN HELD: require another control
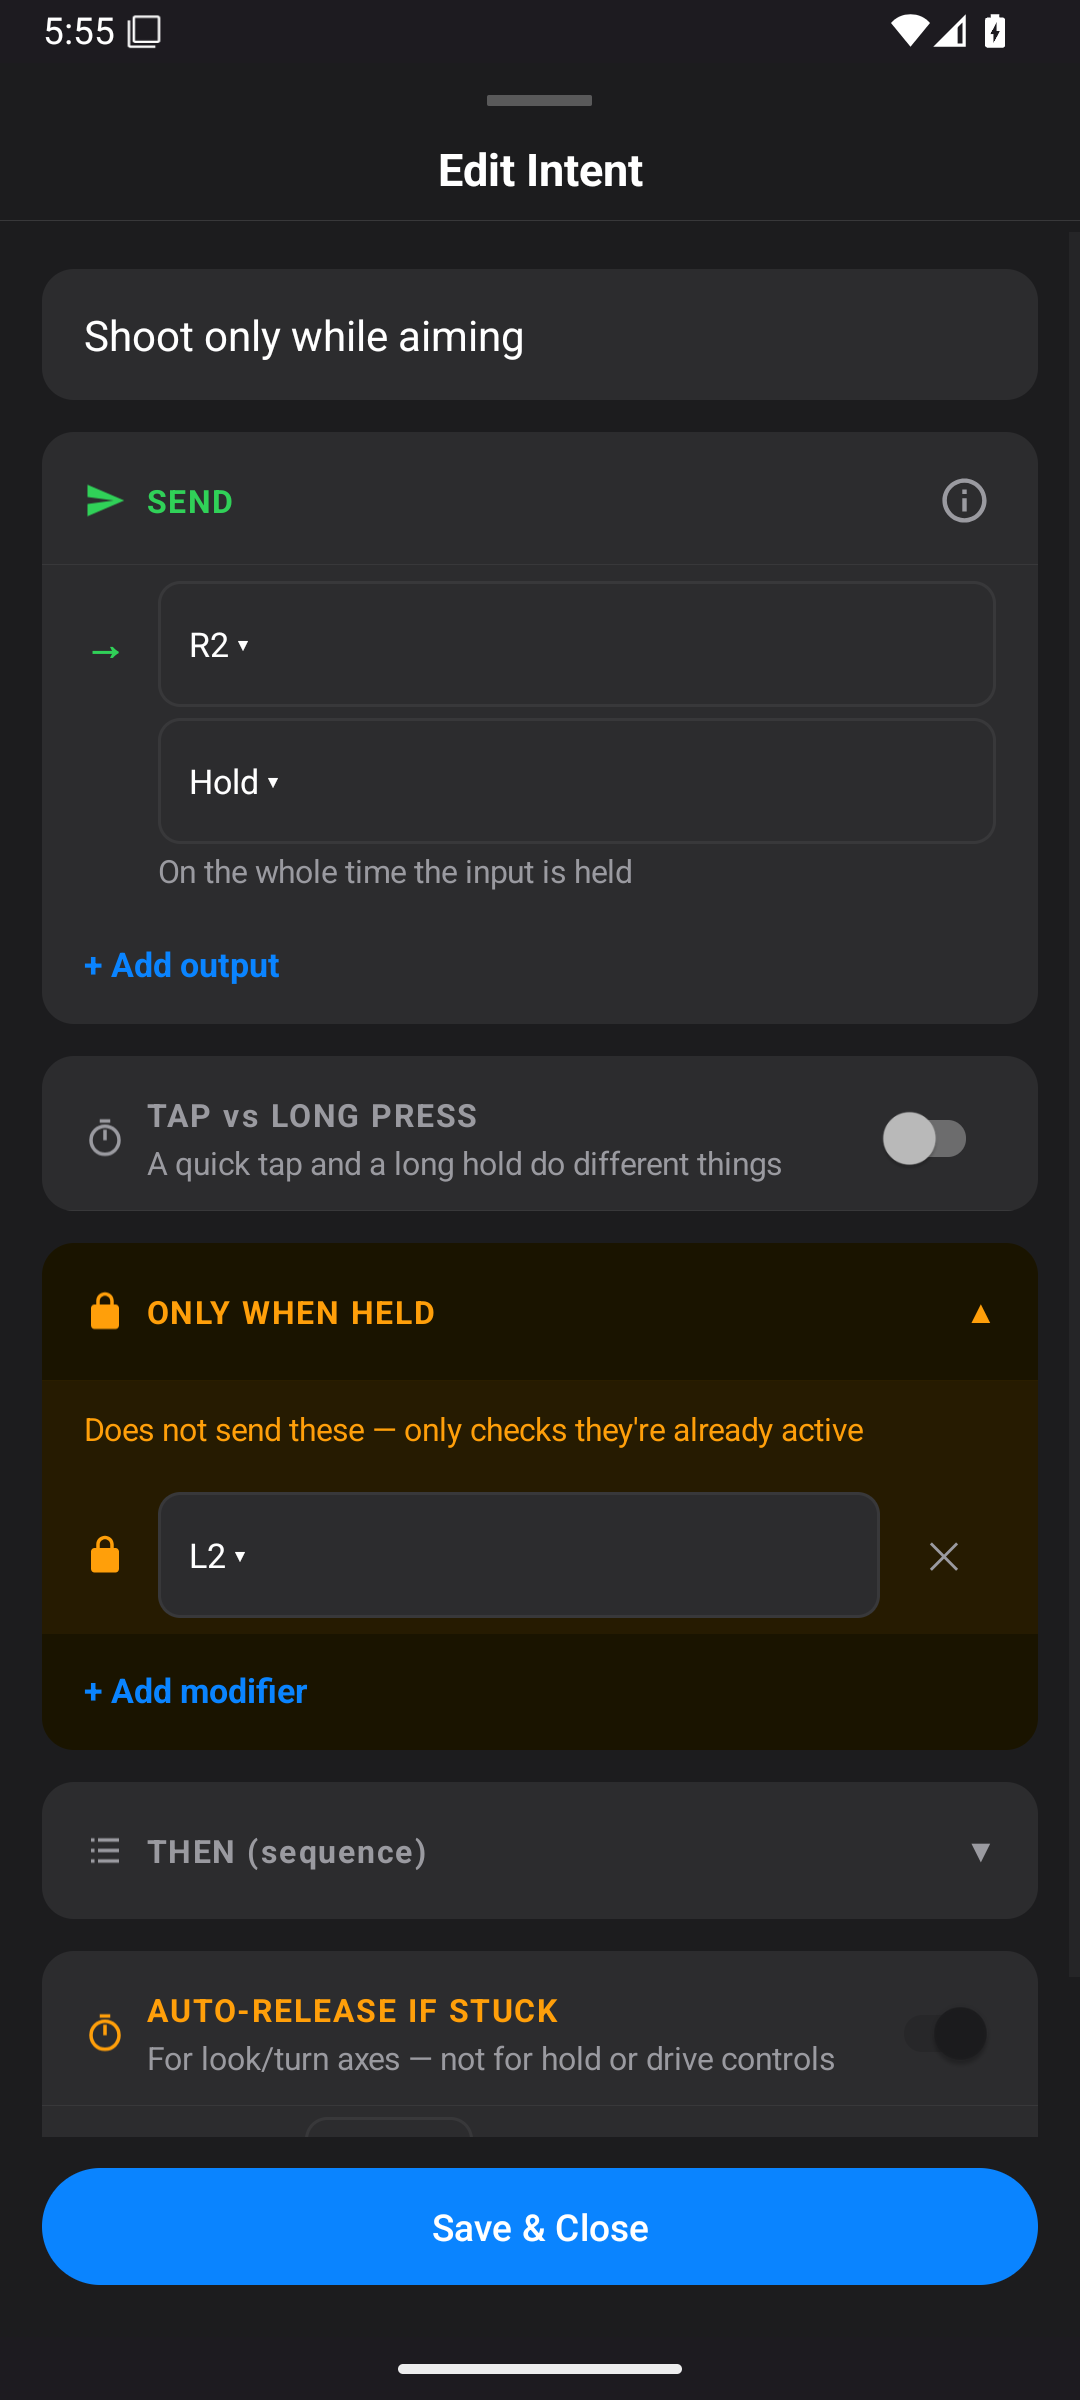
This is a condition. It checks that other listed controls are already active before this Intent can send its actions.
- Open ONLY WHEN HELD.
- Tap + Add modifier.
- Choose the required control.
- Add more modifiers if needed.
- Remove one with × if it is no longer wanted.
- Tap Save & Close.
All listed requirements must be active together. One requirement is not enough if you have listed two.
The check can use an active input with the matching control name or an active controller output from another mapping. This lets a board switch mapped to L2 act as the aiming requirement for another input's R2 Intent. An analog requirement must be far enough active to count; a tiny trigger movement may not pass it.
Use this for a second layer of controls or to reduce accidental actions. For example, permit fire only while aim is held.
Avoid a circular condition. If an Intent is the only thing that can produce L2, requiring L2 before that same Intent may prevent it from starting. Create a separate way to hold the required control.
If a required control stops being active, the gated Intent stops and its sequence is cancelled.
THEN (sequence): send an ordered set of steps
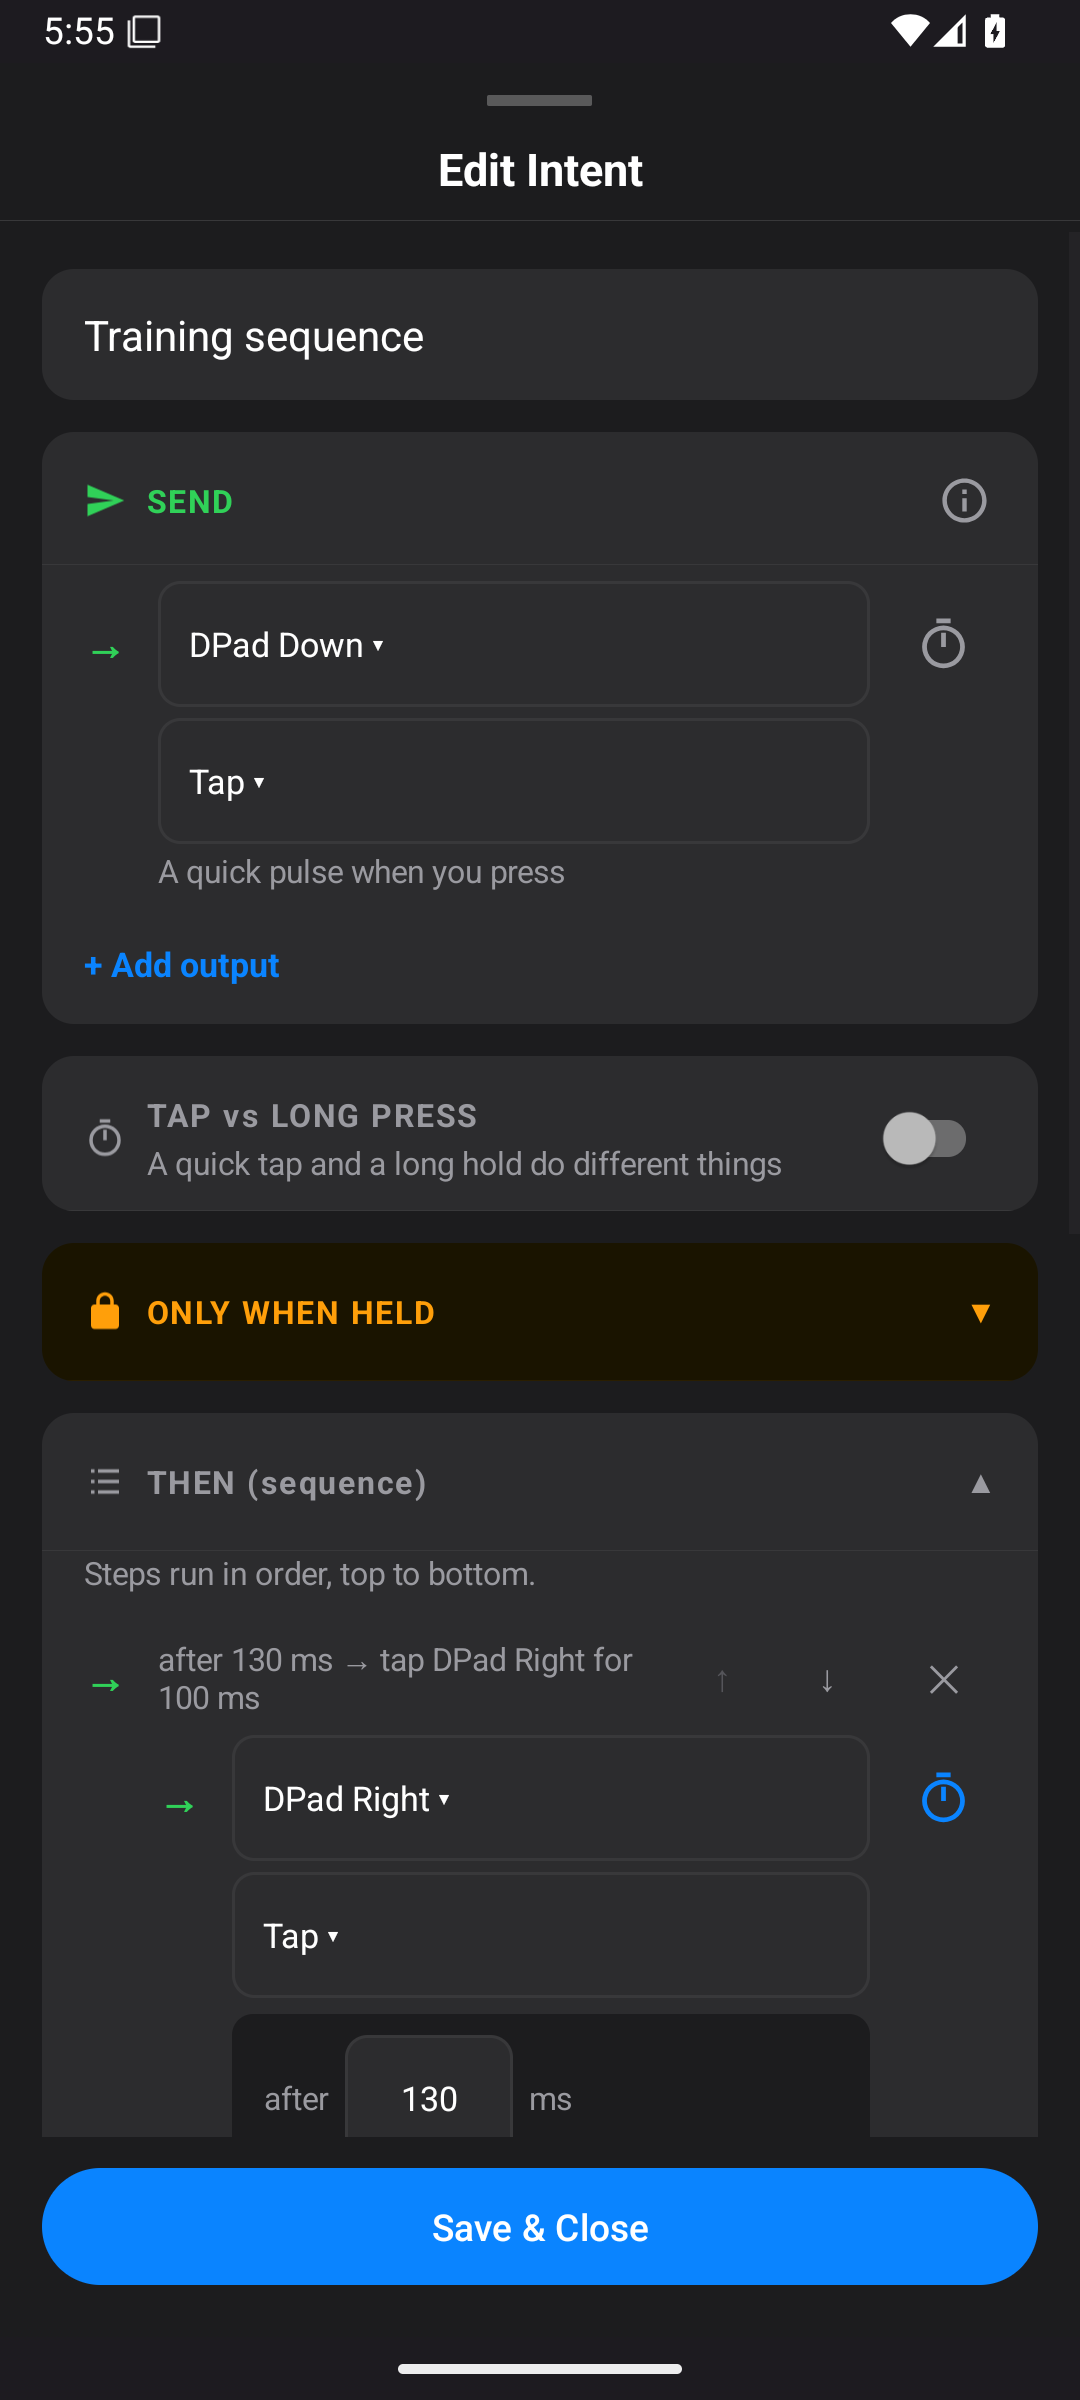
A sequence is useful when a game needs several controls in a particular order. It can reduce the number of physical movements you need to make.
- Put the starting action in SEND.
- Open THEN (sequence).
- Tap + Add step.
- Choose the output target and behaviour for that step.
- Tap the clock icon to show after and for timings.
- after is the delay before that output starts within the step.
- for is how long that output's step window lasts.
- Use + Add output inside the step if several outputs belong in the same step.
- Add the next step with + Add step.
- Use ↑ / ↓ to change the step order. Use × to remove the selected step or row.
- Tap Save & Close.
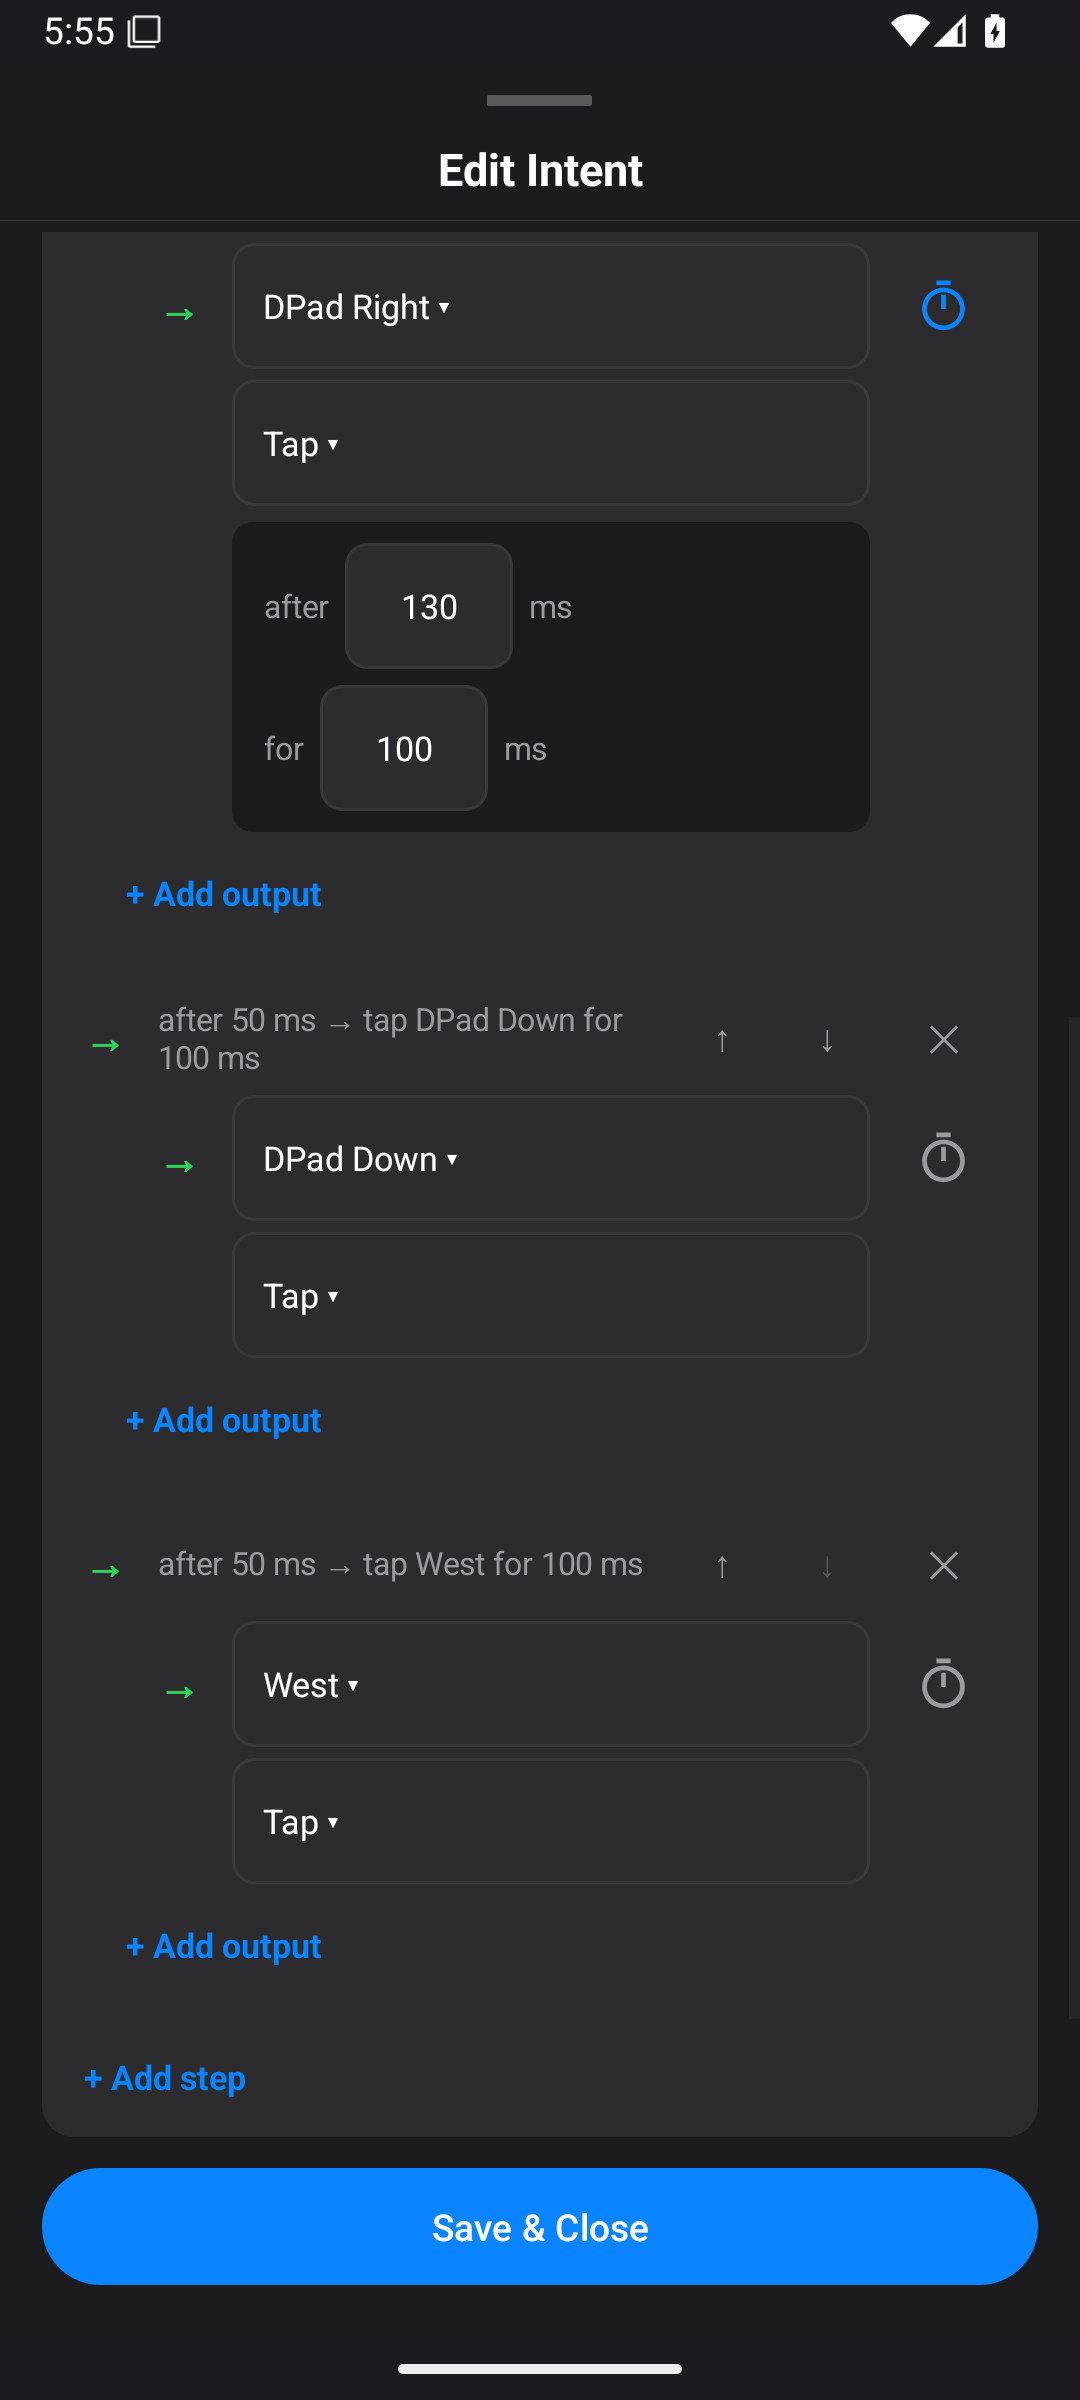
How the sequence clock works
The first sequence step is timed from activation of the input. It can run alongside SEND. The word THEN does not make it wait for a held SEND action to finish.
After a step finishes, the next step begins. If a step contains several outputs, it finishes when the last of those outputs reaches the end of its timing window. Each following step's delay is measured from that step's own start.
Use a short Tap for a starting direction if the next direction should happen separately. A starting Hold could remain active underneath the rest of the sequence.
Each step's behaviour runs inside its timed window. A step is not a new physical press by the user. The current editor sets step timing like this:
| Behaviour inside a step | Result within its for window |
|---|---|
| Hold | Active throughout the window |
| Tap | A single press for the length set by for |
| Rapid tap | Repeated presses within the window |
| Tap while held | Also repeats within the window; the sequence's held source controls whether the chain continues |
| On release | A pulse at the end of the window, normally the final 80 ms or less for a shorter window |
| Long press | Becomes active halfway through the window and stays active to its end |
The step's after / for fields are its timing controls. The ordinary SEND hold-threshold and tap-rate fields are not separate step fields. For a straightforward button sequence, use Tap steps and check their gaps.
Keep the source held for the whole sequence
Releasing the source early cancels the sequence. Keep a switch pressed until the last step has finished. A brief tap does not start a sequence that always runs to completion.
A lost input connection, an unmet modifier, or a stop action can also interrupt it. Repeated taps and simple tap pulses have their own behaviour; do not assume the sequence uses those same release rules.
A sequence still follows priority rules for each output. Another higher-priority mapping can block one of its actions. The whole sequence is not treated as one indivisible action.
AUTO-RELEASE IF STUCK
This is an optional guard for an output that appears stuck. It is especially useful for a look or turn axis that could keep spinning after a control problem.
- In Edit Intent, turn on AUTO-RELEASE IF STUCK.
- Set Release after in seconds.
- Tap Save & Close.
- On the home screen, open the menu and Auto-release safety.
- Check Enable auto-release. This master setting must also be on.
- Review the listed guarded mappings.
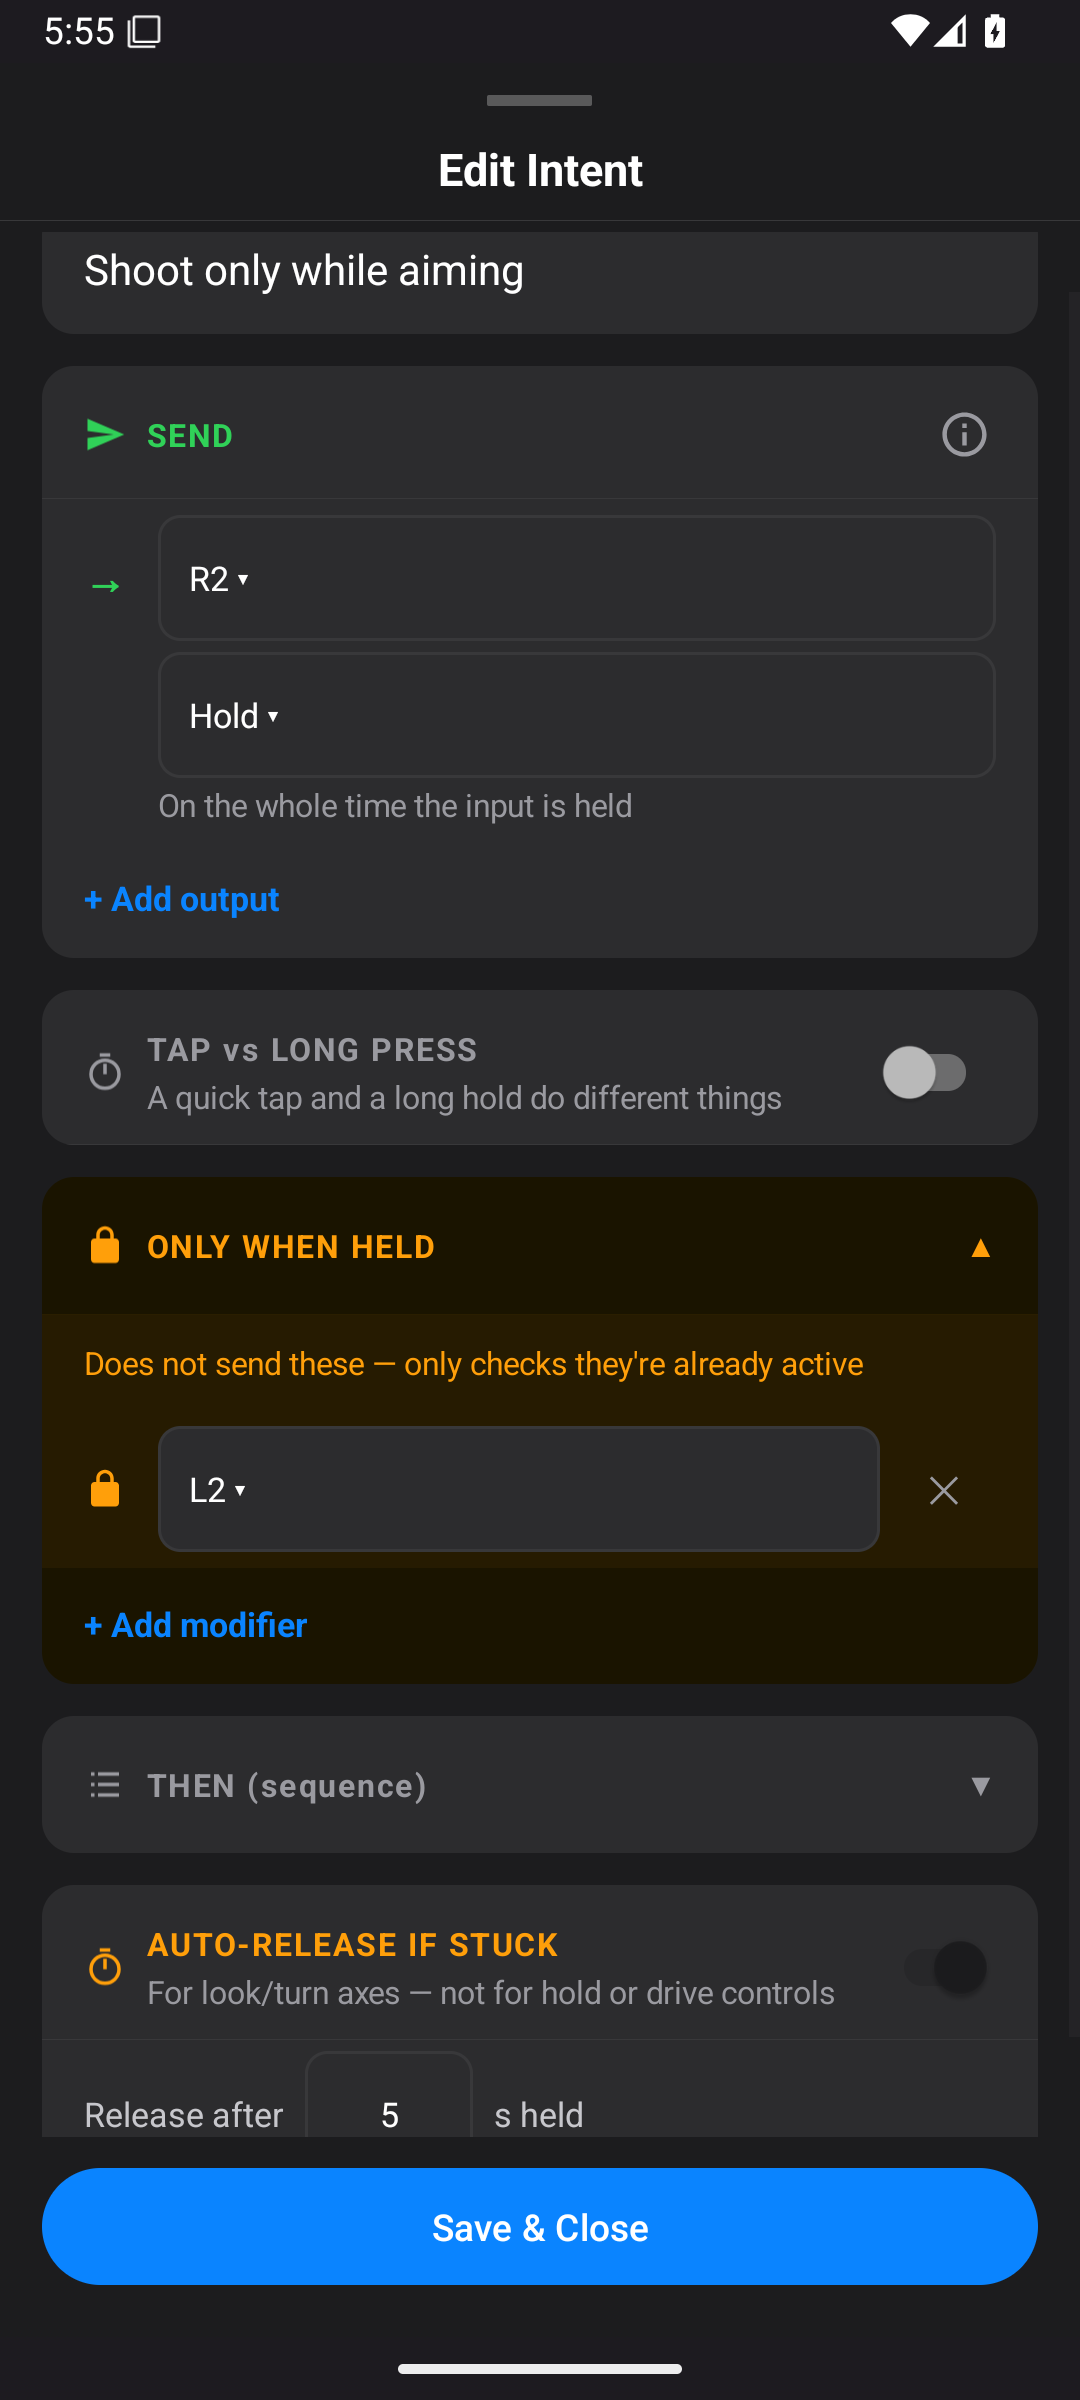
The guard releases a control when its sustained output meets the stuck condition for the set time. Analog guarding considers sustained, unchanging movement. It is not a promise to stop every kind of unwanted action.
Release the source or return it to neutral before trying again after a guard trips.
Leave this off for controls that must stay held for a long time, such as accelerating, moving forward, or hold-to-aim. Otherwise an intended long hold can be interrupted. The screenshot shows where the option is; the aiming example would normally leave it off.
Safety actions in the target list
The output target list also includes Safety Enable, Release All, and Stop Mapping. These are app actions rather than normal game buttons.
| Target | What it does | A useful setup |
|---|---|---|
| Safety Enable | Once activated in a session, allows ordinary output while the enable control remains active | A held enable switch with Hold behaviour |
| Release All | Releases current outputs while keeping the session available | A separate reset or release button |
| Stop Mapping | Stops the active output flow and releases controls | A large, easy-to-reach stop switch |
For a stop switch:
- Create a simple Switch mapping on the source you can reach easily.
- Tap Edit Intent.
- Set the SEND target to Stop Mapping.
- Choose Hold, so pressing it acts immediately.
- Leave modifiers and sequences off for that mapping.
- Save it, start a test session, and confirm the switch stops output.
- Return home and use Stop, then Start Mapping when you want a fresh session.
Release All is useful for clearing outputs without choosing a different profile. Release the source controls before continuing. It is not the same as ending the session.
Safety Enable is activated by the first enable signal seen during a session. Merely adding the mapping does not guarantee that all output is blocked from the moment the session starts. Test by holding it, releasing it, and checking that ordinary actions are blocked afterward. It resets with the session and also reacts if the enable signal stops arriving. Use this as an app convenience, not as a substitute for hardware safety equipment.
Priority and handover
When two inputs ask for the same output at the same time, the app needs to choose one. This is why input order matters.
The rules you need to know are:
- Inputs higher on the home screen have earlier priority.
- Within an input, mappings earlier in its list have earlier priority.
- An idle source does not keep pressing a control just because it is first.
- Different output controls are handled separately.
- A lower-priority source may need to return to neutral before taking over from a higher-priority source.
For example, a helper's controller and your joystick can both control the left stick. If the helper takes control and then lets go while your joystick is already tilted, the app may keep the affected output neutral until you centre and move your joystick again. This helps avoid a sudden jump to an old held position.
If you see Return control to centre to continue, release the affected button or centre the stick, then deliberately activate it again.
A trigger's digital and analog forms can control the same target. Two mappings to R2 are not independent just because one comes from a switch and one comes from a sensor. Similarly, left and right movement share one stick axis.
The engine checks whether input signals are valid and still arriving. When one board disconnects, that board's controls are cleared. Other working inputs can remain useful, subject to handover checks. If the failed board is also your output bridge, the destination connection is affected too.
Use the Control Map to inspect conflicts rather than adding duplicate mappings until something works.
What the current editor does not decide for you
The editor sends controller actions. It does not read the game screen, identify an opponent, choose a finishing move, or know when a menu is open.
There is no game-aware condition such as “only fire when an enemy is visible”. ONLY WHEN HELD checks controls, not game state.
The current behaviour list does not offer a general tap-to-latch toggle or a general app-launch command. For aim that lasts while a switch is pressed, use Hold. Do not look for an unlisted “toggle aim” behaviour in this editor.
Some tuning controls vary by input editor. Face controls have their own advanced settings. Board cards offer their current source, target, and calibration controls. A setting described for one input is not necessarily present for every other input.