
Both board types use the same three-part connection journey:
- Connect to the board.
- Set up its network if needed.
- Verify and name the board.
You use this journey for board inputs and board outputs. The final save button changes to match the job.
An input board reads your controls. An output board sends controller actions to the host. These are separate roles, even if you choose to use one physical board for both.
Open the board setup
For an input, tap + Input → ESP32 Link or Pico W Link.
For an output, tap Add Output / Change Output → ESP32 or Pico W.
For a board already saved as an input, tap Connection on its own home-screen card. From its Input Hub, you can also use the three-dot menu and Connection.
Connect a board that is already on Wi-Fi
- Power the board.
- Connect the phone to a network that can reach the board.
- Tap Wi-Fi in board setup.
- Tap Find boards on this network.
- Choose the correct board from the results. Check its address and identity, especially if several boards appear.
- Wait for the app to receive valid board data.
- If the board is already on the right network, continue to the verification and naming screen.
If a saved address is available, Reconnect saved board lets you try it again.
If discovery does not find a known board, tap Enter board address. Enter that board's IP address and port. Use the values for your board, not the example address shown in this guide. An IP address is the board's address on the network; it can change when the router restarts.
Connection details shows information you can use to check which board you selected. A network connection alone is not the final check. The app also waits for valid input data.
Put a new board on your home Wi-Fi
Use this when the board has the app's supported firmware but has not joined your home network.
- Tap Wi-Fi → Set up a new board.
- Read the setup message.
- If several new boards are nearby, power only the one you are setting up. Their initial Wi-Fi network may have the same name.
- Tap Open Wi-Fi settings.
- Join the board's Intent Controller Wi-Fi network.
- If Android says this network has no internet, stay connected to it.
- Return to Intent Controller.
- Tap Connect to setup board.
- When the network form opens, enter your home Wi-Fi details.
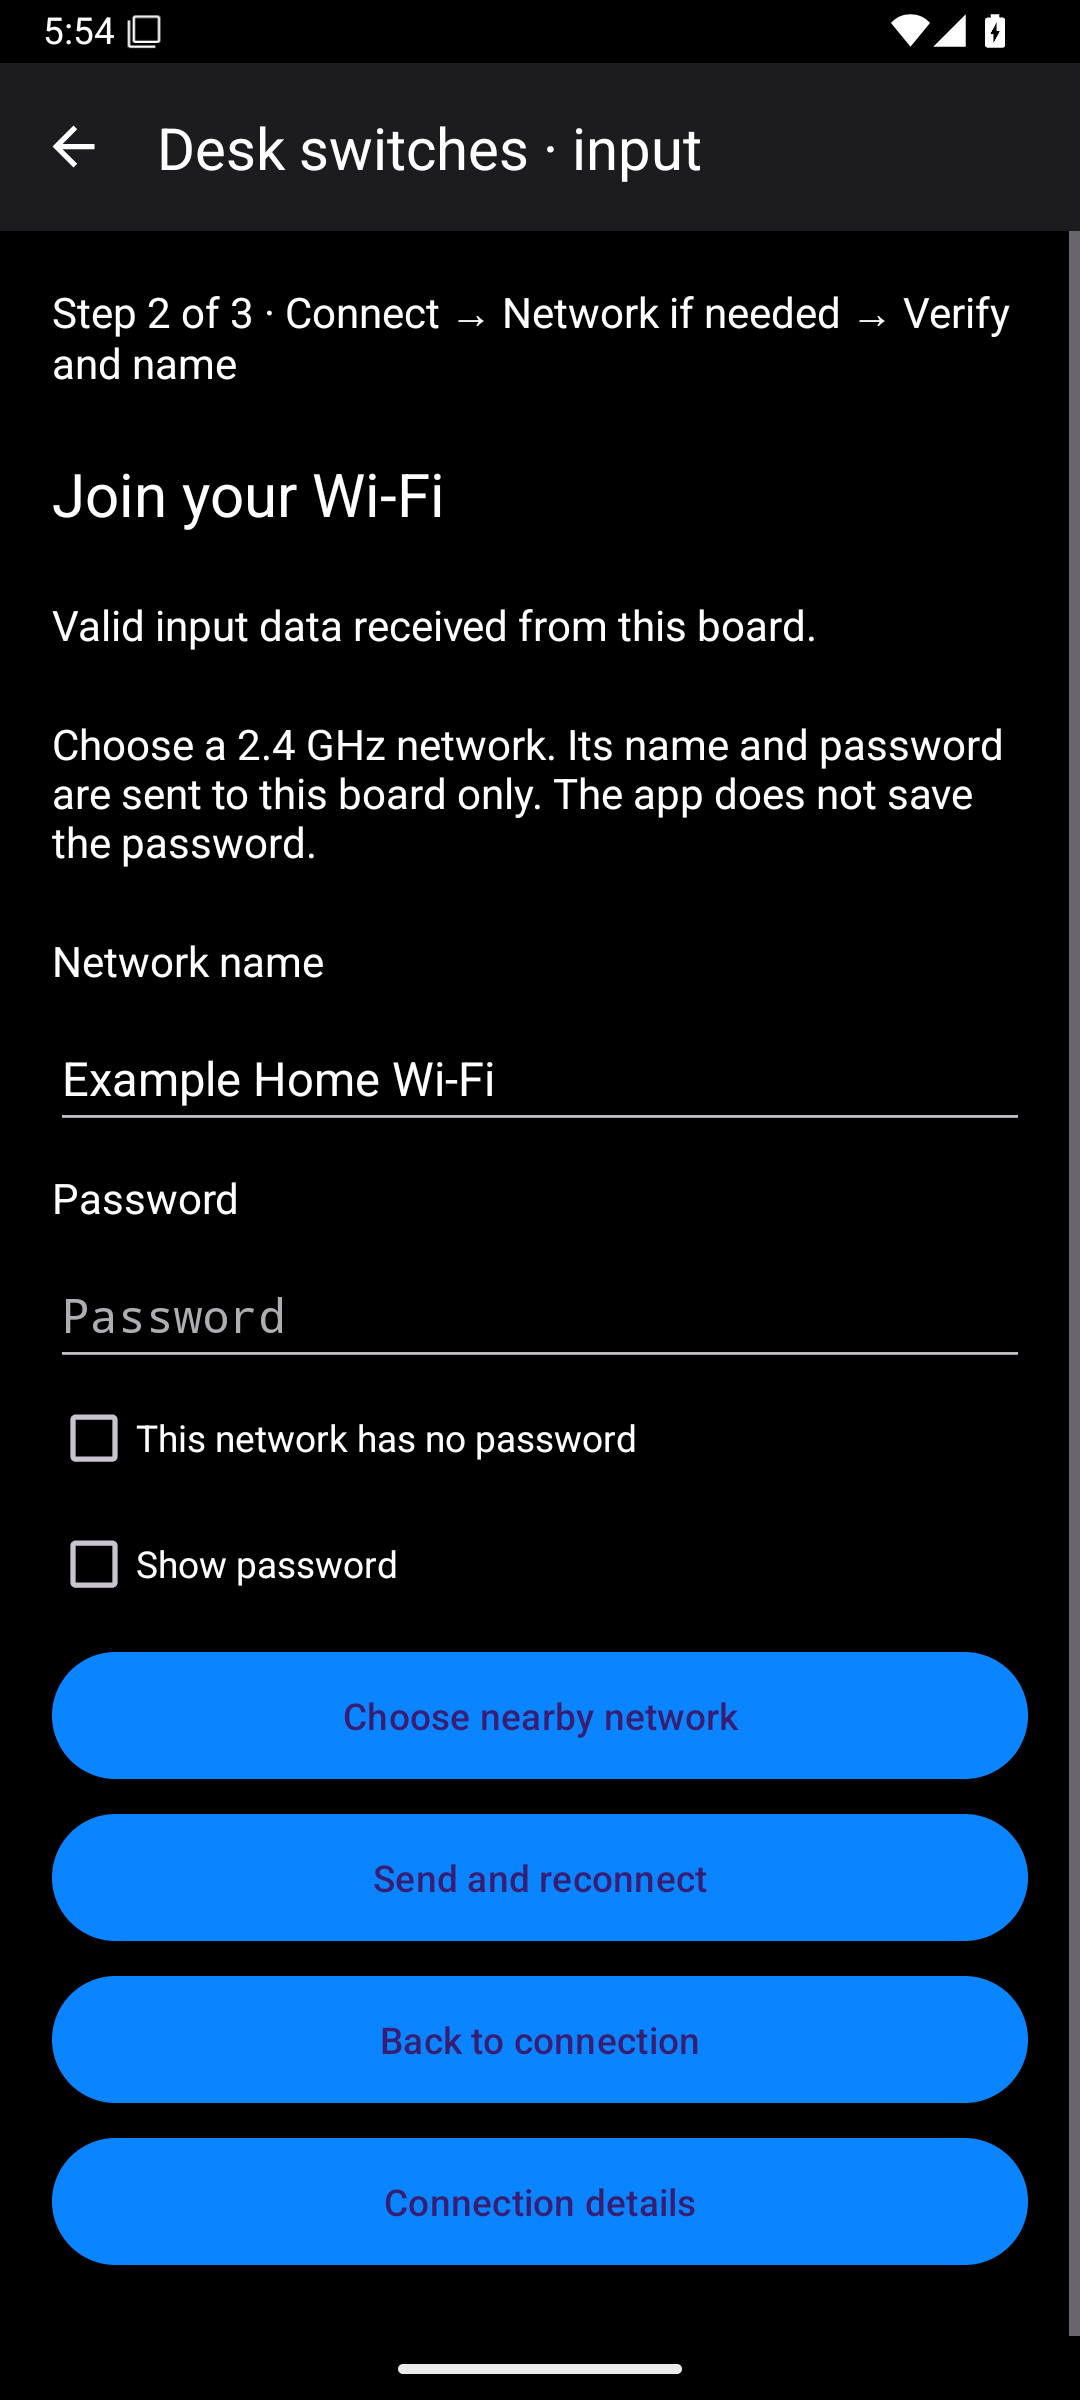
- In Network name, enter the name exactly, including upper- and lower-case letters.
- You can tap Choose nearby network to select a name. Android may ask for location access to scan networks. You can type the name instead.
- Enter the Password. Tap Show password if you need to check it.
- Only tick This network has no password if the network is actually open.
- Tap Send and reconnect.
- Let the board restart. A brief disconnection is expected.
The current form supports network names from 1 to 32 printable ASCII characters, without commas. Passwords must be 8 to 63 printable ASCII characters, or blank for an open network. Letters, numbers, spaces, and common punctuation are ASCII. Names containing characters such as emoji are not supported by this setup form. Passwords can contain commas.
The app does not keep the Wi-Fi password as a saved profile setting. You normally enter it once to set up the board. If you close setup and later need to change the network, you may need to enter it again.
Reconnect after the board restarts
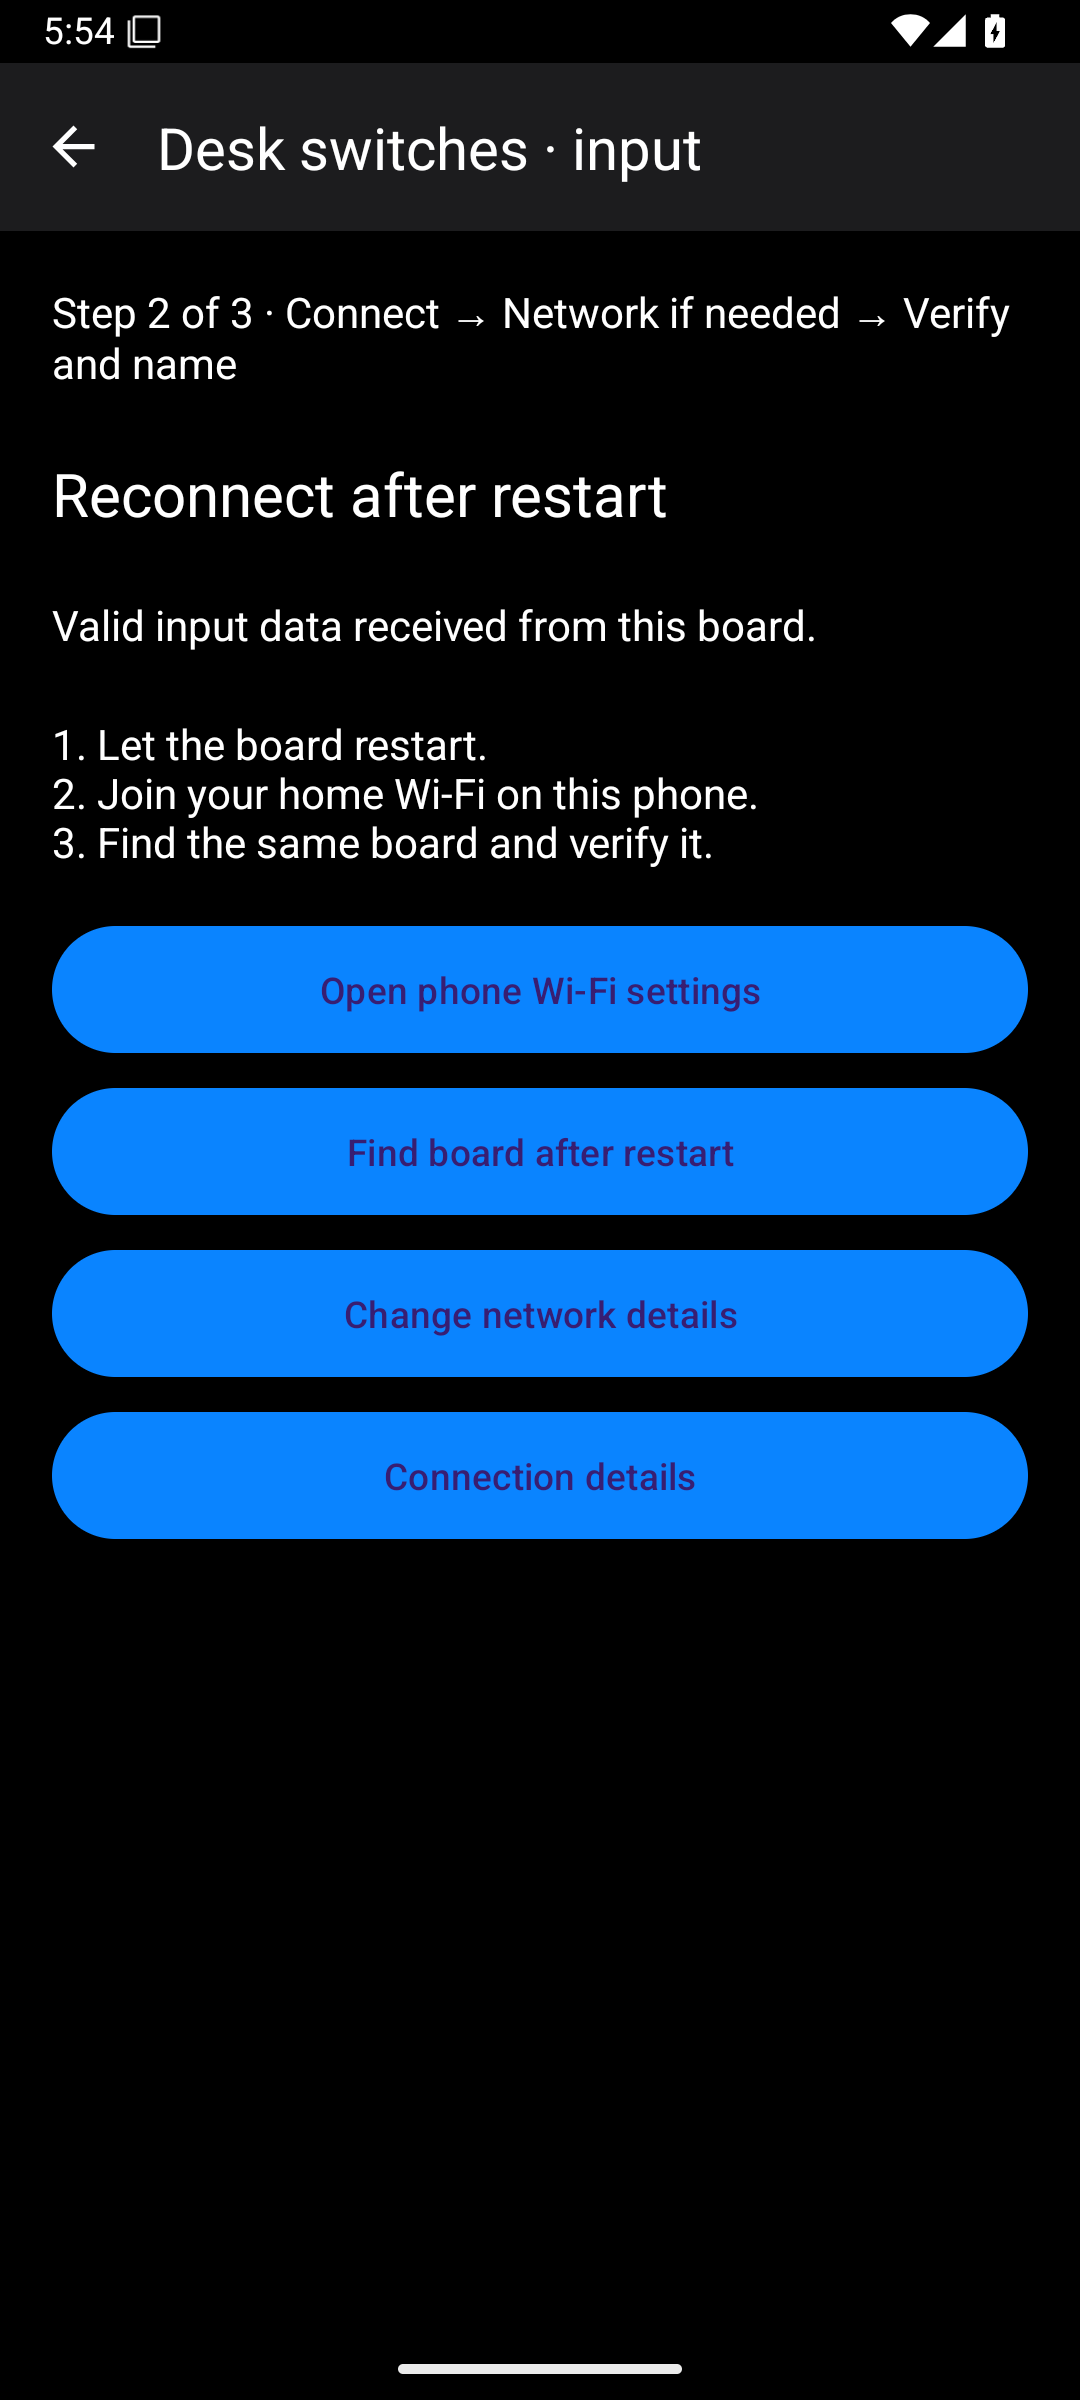
- Tap Open phone Wi-Fi settings.
- Join your home Wi-Fi on the phone.
- Return to the app.
- Tap Find board after restart.
- Choose or reconnect to the same board.
- Wait for valid board data.
If it does not reappear, check the network name and password. Use Change network details to correct them. Do not add another input card just because the board is restarting.
Connect over USB
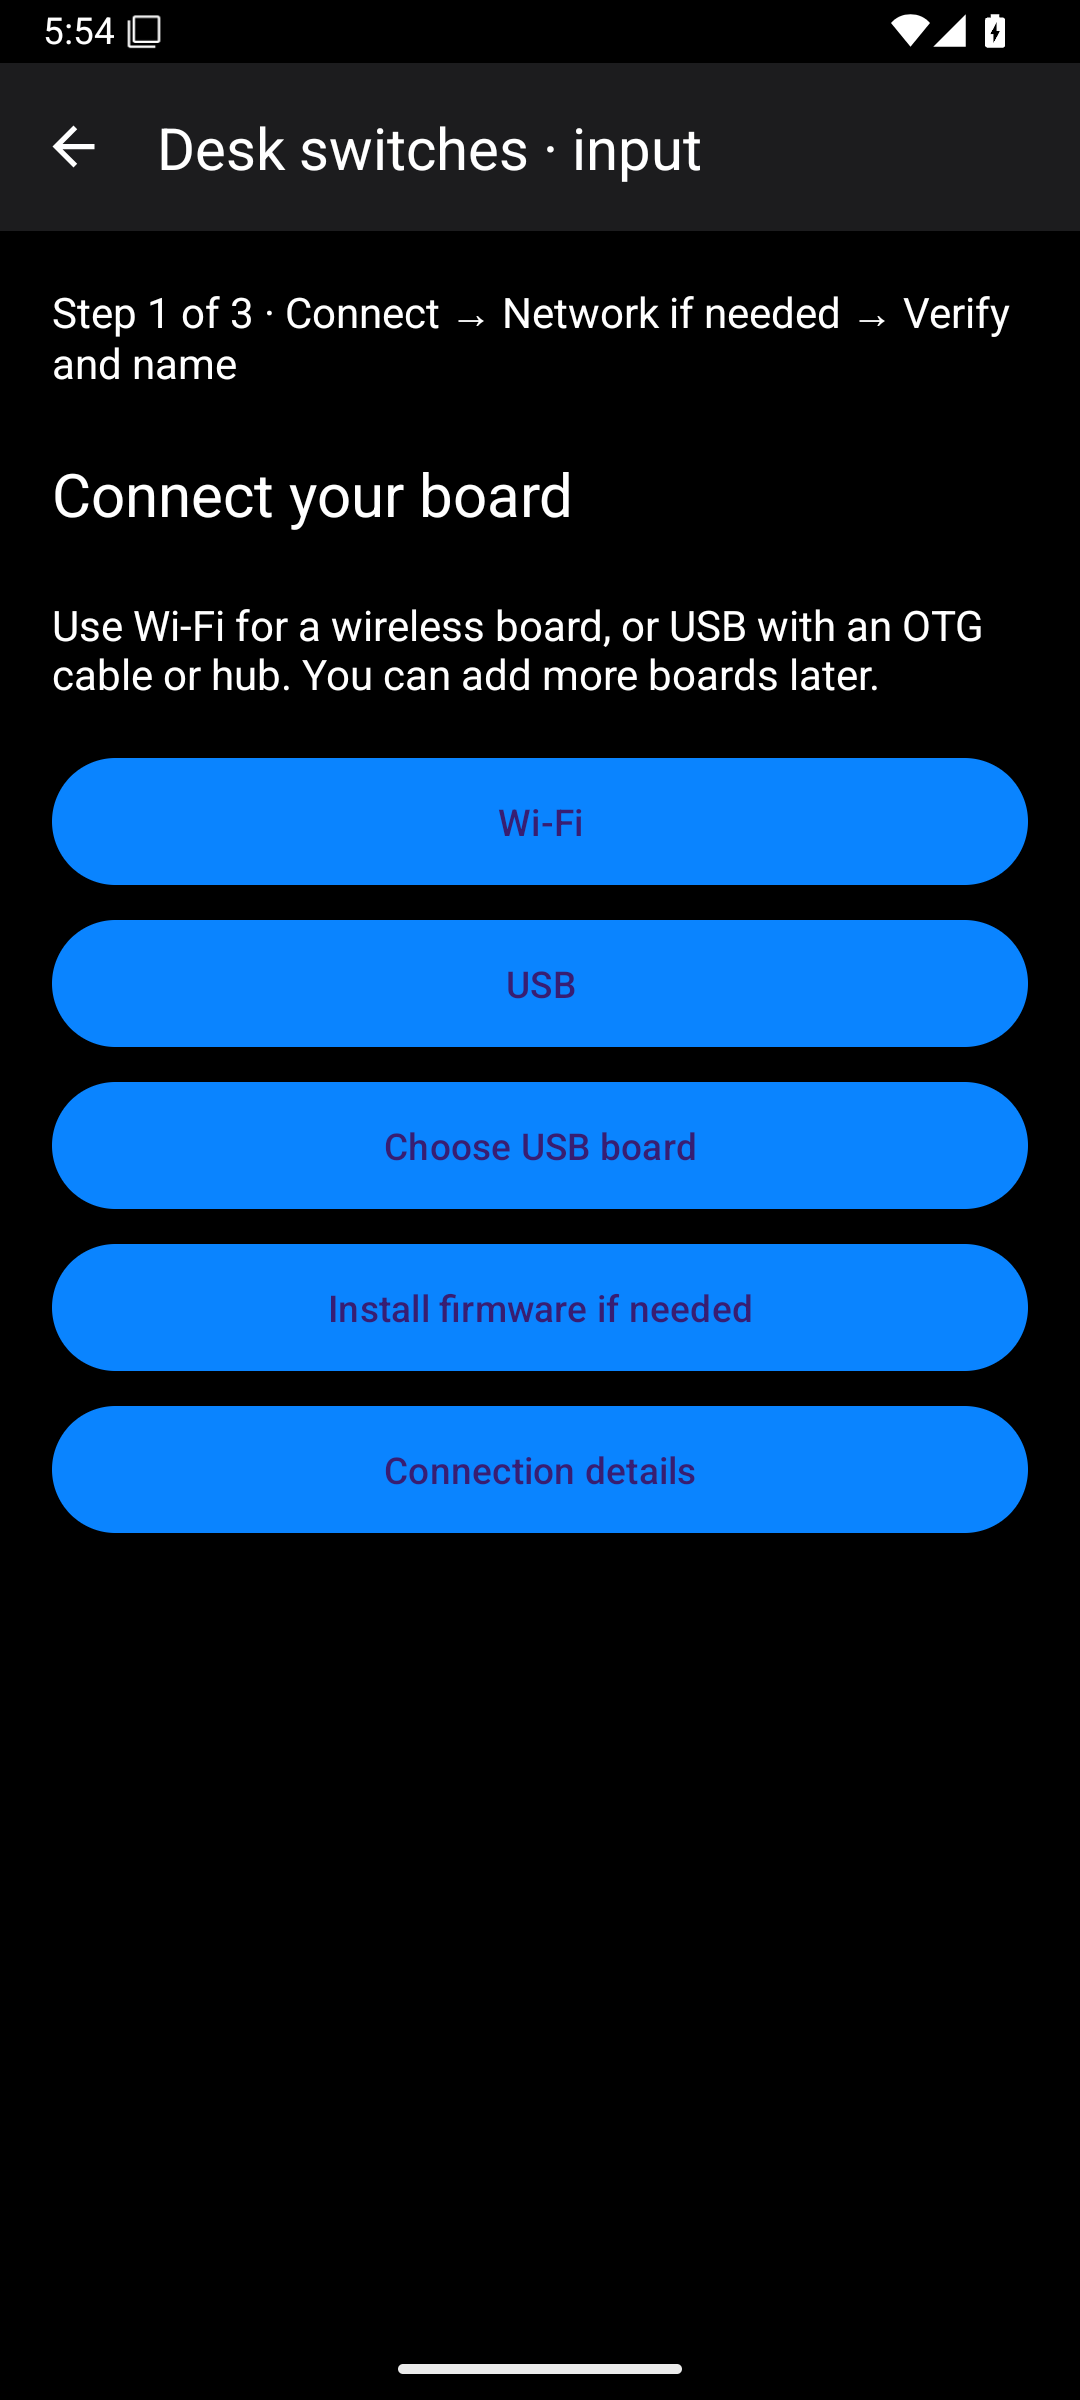
- Connect the board to the phone with a data cable and OTG adapter or hub.
- Tap USB.
- Tap Choose USB board.
- Select the correct device. If several are attached, check the device details.
- Choose its serial port if asked. Many boards have one port, numbered 0.
- Accept Android's USB access request for the selected board.
- Wait for valid board data.
- Continue to verification and naming.
A board appearing in the USB list only means Android can see it. It must also speak the supported board protocol before setup can be verified.
If the board needs firmware
The app offers Install firmware if needed. Use this when the board has no suitable firmware or the app cannot read valid data from it. Choose the board and follow the on-screen instructions. Installing firmware changes the software on that board.
For a Pico W installation, the app may ask you to connect it in BOOTSEL mode. Hold the board's BOOTSEL button while connecting USB, then follow the app's storage-device selection and installation steps.
For ESP32, follow the app's USB and boot-button instructions for the supported board. A product labelled ESP32 is not automatically compatible with every bundled firmware image.
After installation, return to the connection journey and verify the board. You do not need to install firmware every time you connect. Detailed wiring and firmware building are outside this app guide.
Verify and name the board
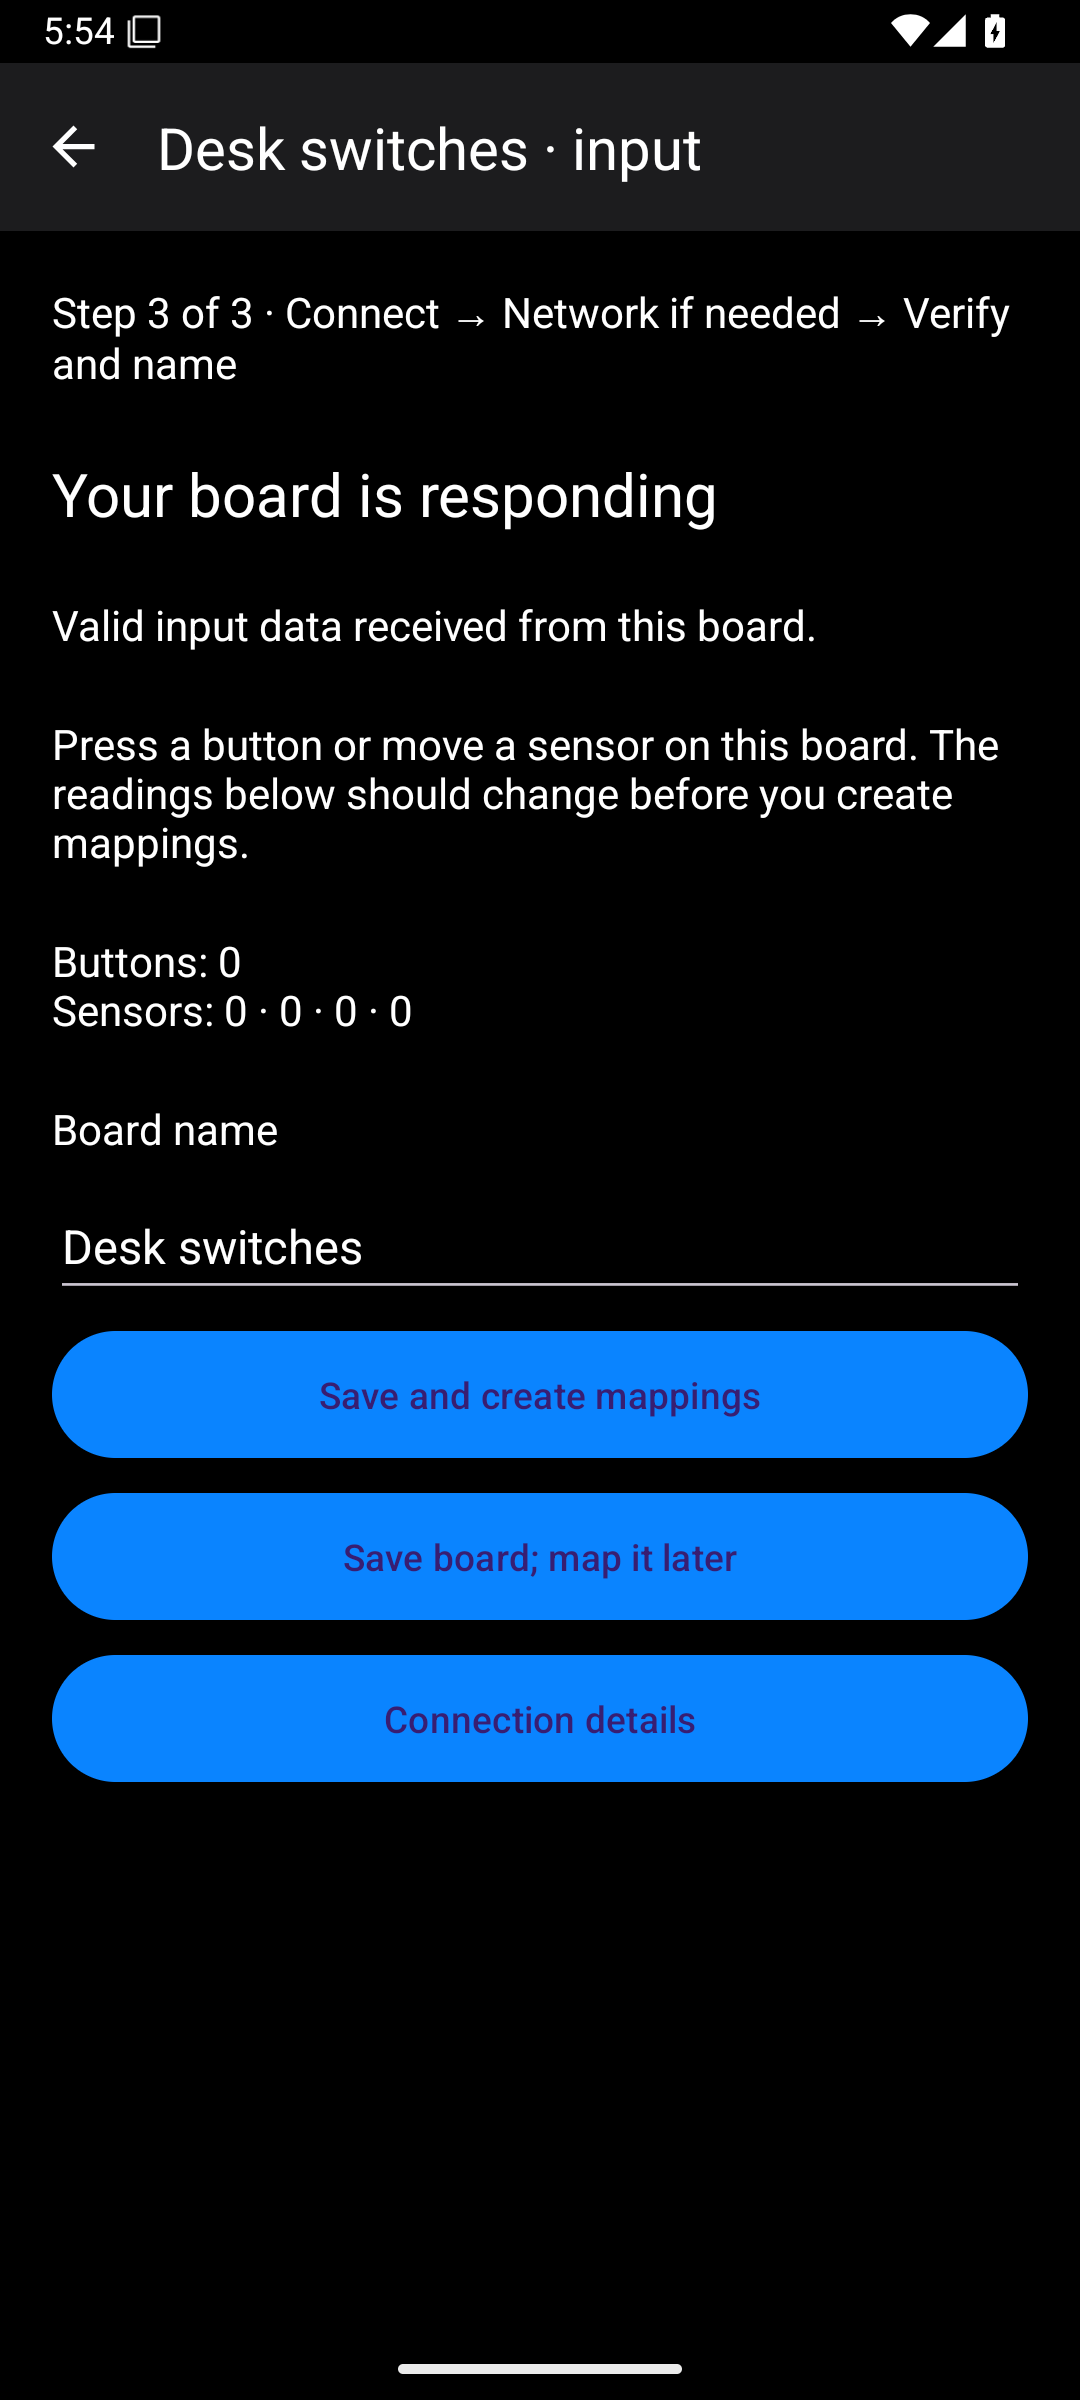
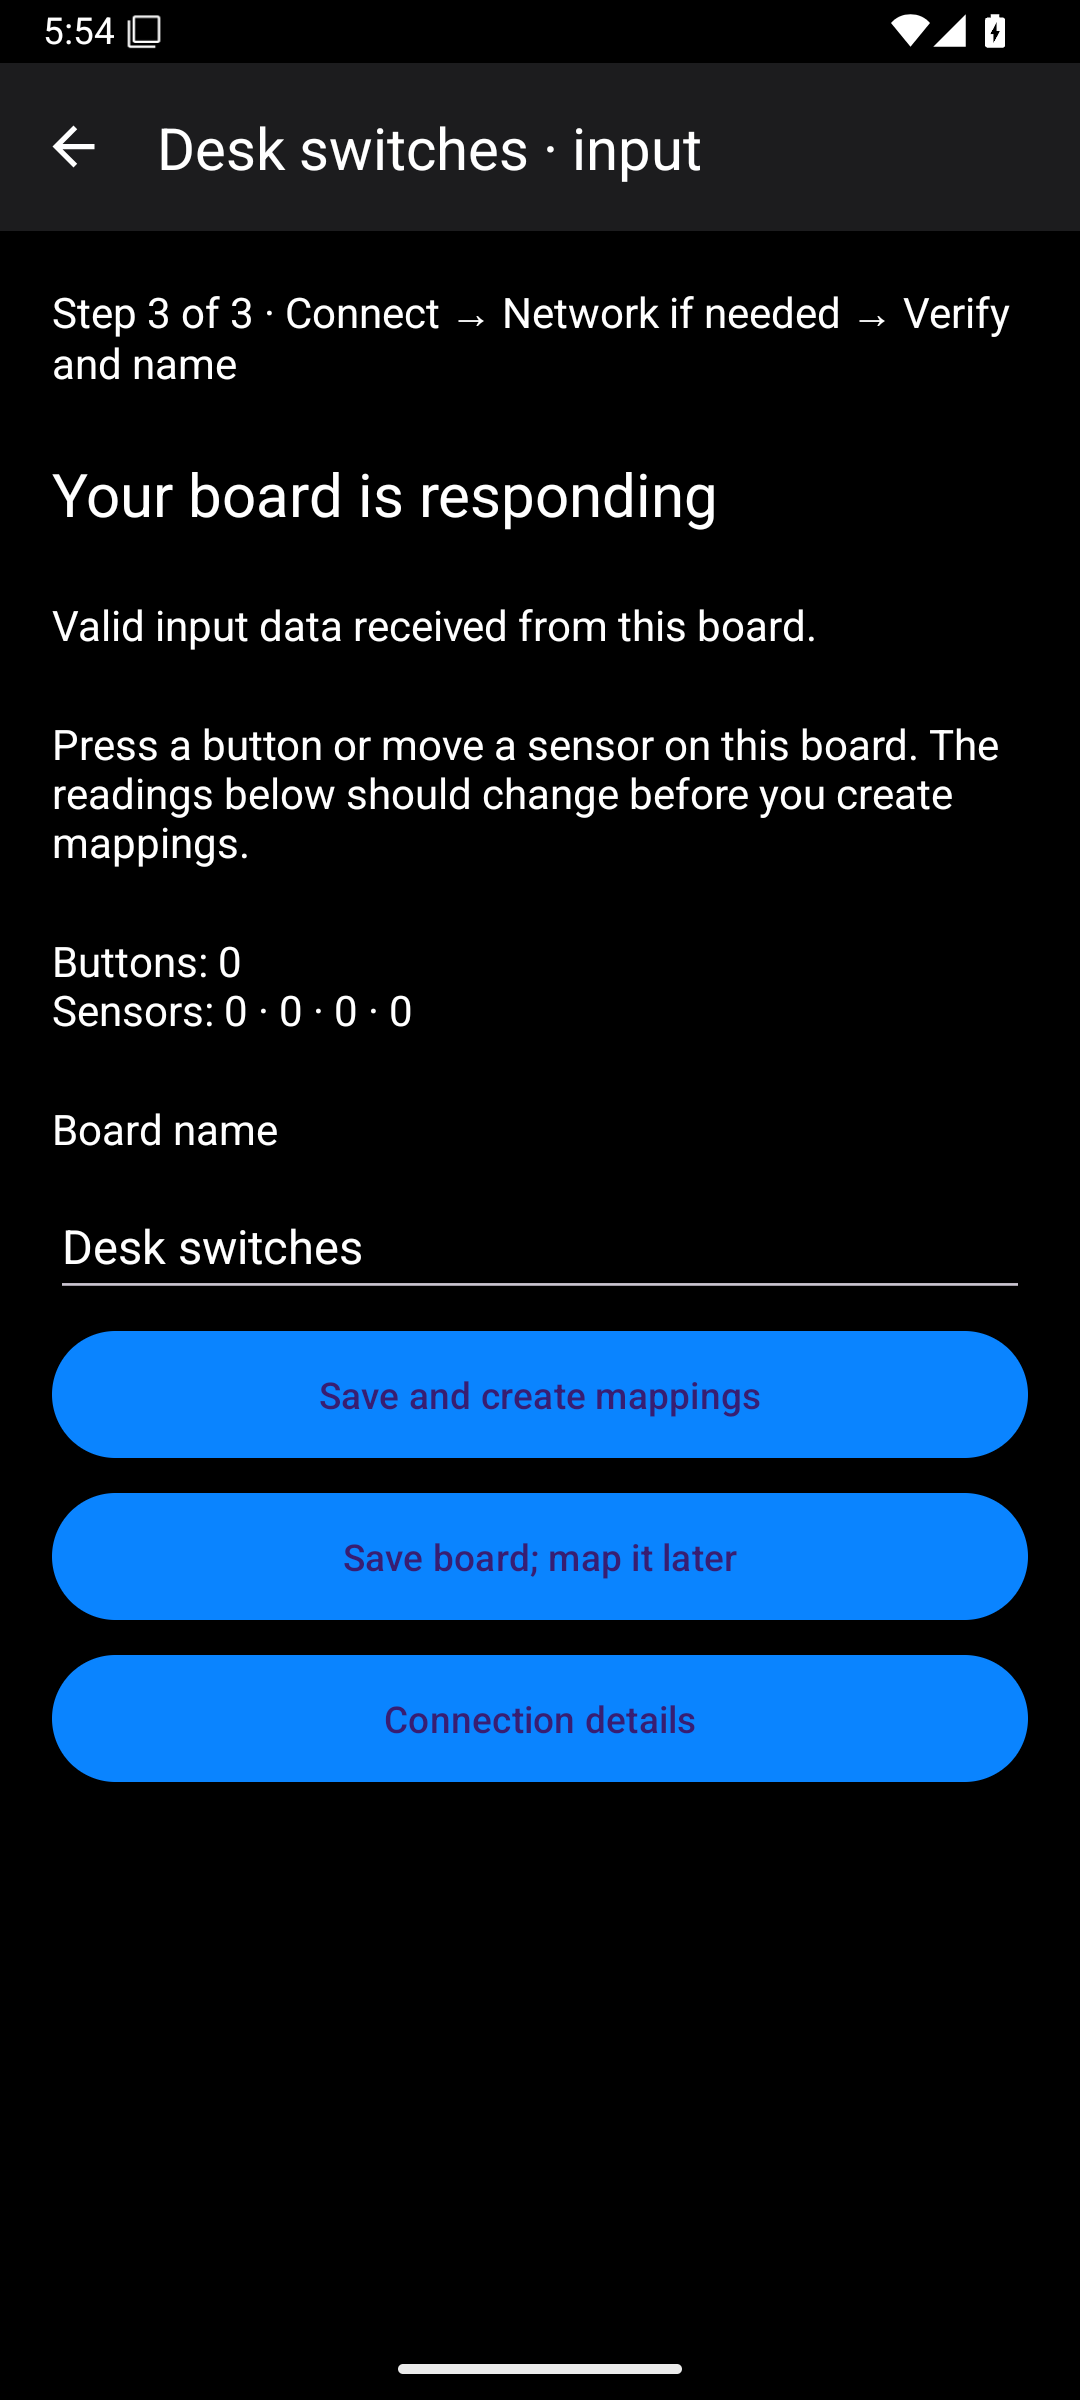
- Wait for Your board is responding.
- Press a physical switch or move a sensor attached to that board.
- Check that its readings change. This also helps confirm you selected the right physical board.
- Enter a useful Board name. Try Desk switches, Chair controls, or Left-hand stick.
- For an input, tap Save and create mappings to configure controls now.
- Alternatively, tap Save board; map it later. The connection is saved, but that input still needs mappings before it can help you play.
- For an output, tap Save and choose controller. Continue with the output instructions below.
When editing an existing connection, the button may say Save connection. This returns you to the screen you came from.
If you verified through USB and want to switch to Wi-Fi, use Set up Wi-Fi instead when offered.
Resume an unfinished setup
If you leave input-board setup before finishing, the home screen can keep a draft card. Tap Continue setup to resume it. This avoids creating duplicates.
Leaving a new output setup does not turn an unverified draft into your working destination. Finish connection setup and controller selection before expecting it to work.